Add
New / Modify Existing Person Information
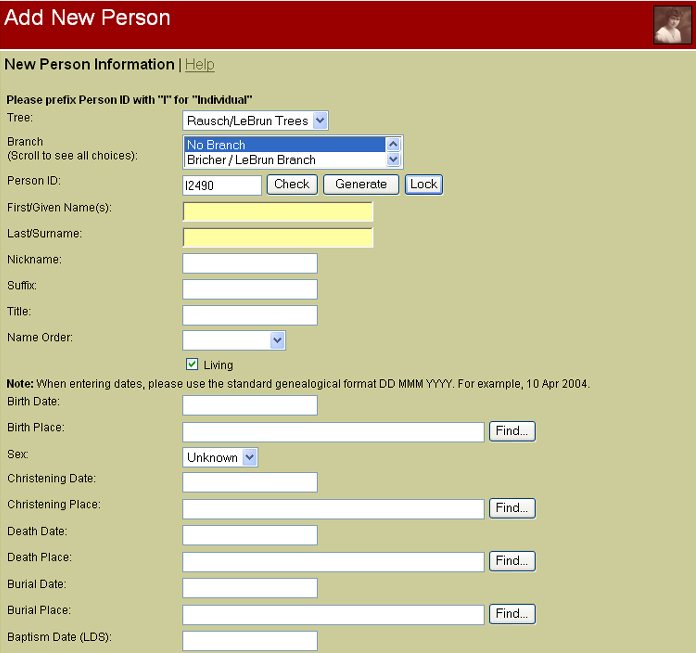
Required fields: The only required fields
are Person ID and Sex, although it is highly recommended
that you enter at least part of the name and as much other
information as possible. Fields left blank will not show up
when the individual record is displayed for public viewing.
Person ID: The Person ID must be unique and
should consist of an upper case "I" followed by a number (no
more than 9 digits). An available, unique ID will be
supplied when the page is first displayed and whenever a
different tree is selected, but you may enter your own ID if
desired. To check if the ID you have entered is unique,
click Check. A small pop-up window will tell you if
the ID is in use or not. To automatically generate a new
unique ID, click Generate. This will locate the
highest number in your database and add 1. A small window
may briefly appear and disappear. To ensure that the
displayed ID is not claimed by another user before you can
save your record, click Lock. NOTE: If you are
using this software in conjunction with a PC/Mac-based
genealogy program which also creates IDs for new
individuals, it is HIGHLY RECOMMENDED that keep all IDs in
sync between the two programs at all times. Failure to do
this may result in collisions and may also cause your photo,
history and headstone links to become unusable. If your
desktop program creates IDs that do not conform to
traditional standards (for example, the "I" is at the end,
not the beginning), you can edit the "prefixes.php" file
that came with TNG to change the convention TNG uses to
match this.
Branch: If Branches exist and you are
not assigned to a particular branch, you may elect to assign
this individual to one or more of the existing branches.
This will limit access to this person's data to users with
sufficient permissions.
Names: Enter the individual's first
and/or last name. If you have elected to support surname
prefixes as a separate entity (so the prefixes are ignored
during sorting), enter the prefix portion in the box labeled
Surname Prefix. If this box is not visible, go to the
Setup/General Settings and check the option to use surname
prefixes.
General Individual: To add notes or
sources to the individual in general, click the buttons next
to this label.
Living: If this person is alive, and if
you wish to restrict access to this person's data to users
who are logged in with sufficient privileges, check this
box.
Dates: When the full date is known,
always enter it in the standard genealogical format, DD MMM
YYYY (for example, 18 Feb 2003).
Places: List place information from
local to general, separating each locality by a comma (for
example, "Boston, Suffolk, Massachusetts, USA"), or select
an existing place name by clicking Find.
More: Additional information may be
entered for many events. Where more information for an event
already exists, this is indicated by an asterisk (*).
Notes: Notes may be linked to individual
events (existing records only). Multiple notes can be
associated with any given event. To create a note for an
event, click on the Notes button next to the event.
Existing notes are indicated by an asterisk (*). For further
information, see the Help link on the Notes page.
Sources: Sources may be linked to
individual events (existing records only) by creating
citations. Multiple citations can be associated with any
given event. To create a citation for a source and link it
to an event, click on the Sources button next to
the event. Existing citations are indicated by an asterisk
(*). For further information, see the Help link on the
Citations page.
Other Events: Use the buttons below the
Other Events box to add, edit or delete non-standard events.
The order in which the events are displayed is determined by
date (if applicable), and by the event types' assigned
priority. This priority may be changed when editing the
event types. NOTES: Changes made here are written to the
database as they are made, meaning that they are already
saved before you save the rest of the Existing Person
information.
Parents: Edit the family where the
current individual is listed as a child by clicking on the
family ID link associated with any set of parents. To edit
the individual information for either parent, click on the
parent's name. Indicate a relationship between the
individual and this set of parents by choosing from the
dropdown list (optional). To change the order in which
multiple parent sets are displayed, enter numbers in the
appropriate boxes. To remove the current individual as a
child in this family, check the box next to Unlink
current individual as child.
Spouses: Edit the family where the
current individual is listed as a spouse by clicking on the
family ID link associated with that spouse. To edit the
individual information for a spouse, click on the spouse's
name. To change the order in which multiple marriages are
displayed, enter numbers in the appropriate boxes. To remove
the current individual as a spouse in this family, check the
box next to Unlink current individual as spouse.